
Pulling the drain plug on a 1980s classic for the first time feels different from working on a modern car. There’s more at stake, the parts are harder to replace, and the engine has decades of history behind it. Yet a proper oil change is still the single most effective thing you can do to protect a vintage engine’s longevity. Early 1980s vehicles come with their own quirks: some use old-style strainers instead of spin-on filters, torque specs differ wildly, and the wrong oil weight can accelerate wear on worn seals. This guide walks you through every stage, from gathering the right tools to checking for leaks after startup, so you can do the job confidently and correctly.
Table of Contents
- What you need: Tools, oil, and preparation
- How to change the oil: Step-by-step instructions
- Common pitfalls and troubleshooting for 1980s engines
- Checking your results: Tips for safe startups and ongoing maintenance
- Why classic car oil changes are misunderstood—and what matters most
- Where to find the best oil for your 1980s classic
- Frequently asked questions
Key Takeaways
| Point | Details |
|---|---|
| Use correct vintage parts | Classic cars may need unique filters or gaskets not found in modern vehicles. |
| Warm engine first | Slightly warming your engine makes old oil drain fully and smoothly. |
| Double-check for leaks | Always inspect for drips or leaks after refilling and startup for vintage engines. |
| Track your oil changes | Keeping a detailed log helps preserve your car’s value and health. |
| Check torque settings | Using the proper torque for plugs and strainers prevents costly engine damage. |
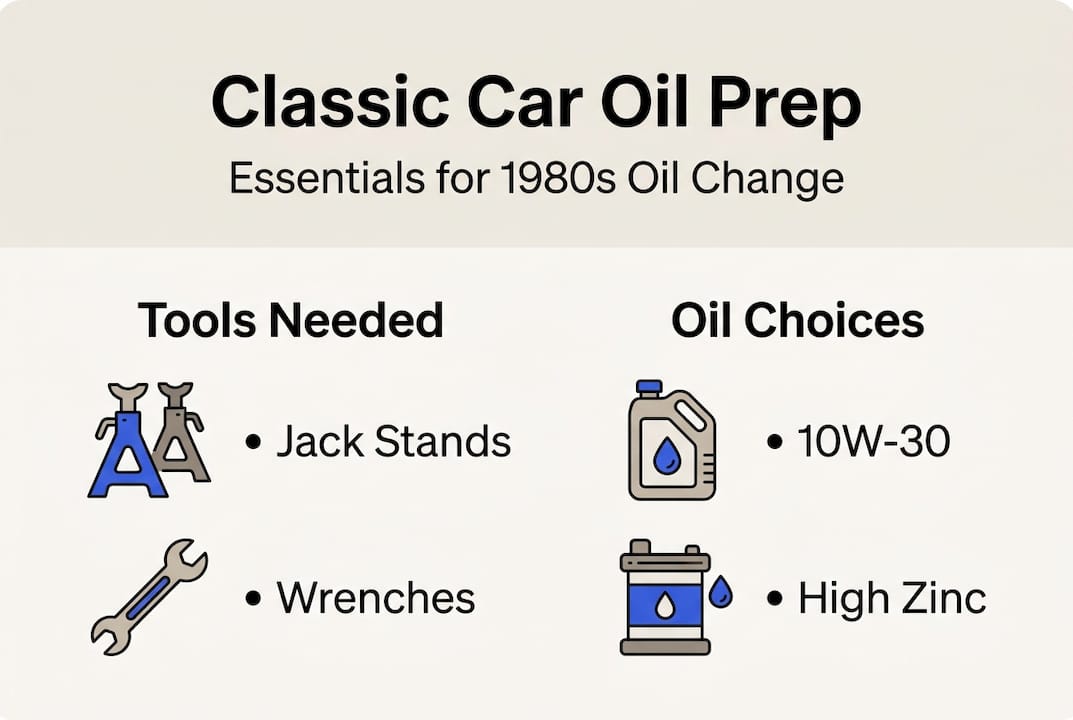
What you need: Tools, oil, and preparation
Once you know why oil changes are critical, the first step is gathering the essentials specific to your 1980s vehicle. Skipping this stage is where most DIY mistakes begin. Classic cars are not forgiving when you improvise with the wrong parts.
Essential tools for the job:
- Drain pan (at least 6-quart capacity)
- Socket set with 3/8-inch and 1/2-inch drives
- Oil filter wrench or strap wrench
- Torque wrench (critical for vintage drain plugs)
- Clean rags and shop towels
- Jack stands and a floor jack
- Safety glasses and nitrile gloves
- Funnel for refilling
For safety, never work under a car supported only by a floor jack. Jack stands are non-negotiable. Position them on the vehicle’s frame rails, not the rocker panels, which can be fragile on older cars.
Choosing the right oil matters more than most people realize. A
Cadillac V8 oil change demo shows that proper preparation includes gathering the right grade oil and filter type for your early 1980s model. For example, if you own a Buick Regal from that era, the oil choice for 1982 Buick Regal differs by engine displacement and condition. Always confirm your oil weight (commonly 10W-30 or 10W-40 for early 1980s V8s) and total capacity before buying.
| Vehicle type | Typical oil weight | Filter type | Approx. capacity |
|---|---|---|---|
| 1980s V8 (Buick, Cadillac) | 10W-30 or 10W-40 | Spin-on filter | 4-5 quarts |
| 1980s 4-cylinder (Cavalier) | 5W-30 or 10W-30 | Spin-on filter | 4 quarts |
| Air-cooled VW (pre-1980s) | 20W-50 | Strainer system | ~3 quarts |
| 1980s inline-6 | 10W-40 | Spin-on filter | 4-5 quarts |
Beyond oil, pick up a new drain plug gasket. Many 1980s engines use a copper or aluminum crush washer on the drain plug, and reusing an old one risks a slow drip that ruins an otherwise perfect job.
Pro Tip: Lay out every tool and part before you warm up the engine. Once the oil is hot and draining, you don’t want to be hunting for a funnel or a missing socket.
How to change the oil: Step-by-step instructions
With all your materials ready, it’s time to tackle the oil change procedure itself, with extra attention to vintage details.
- Warm up the engine for 3-5 minutes. Warm oil flows faster and carries more contaminants out with it. Don’t let it get fully hot, just warm enough to thin the oil.
- Raise and secure the vehicle. Use your floor jack and place jack stands firmly under the frame. Shake the car before getting underneath.
- Locate the drain plug. On most 1980s V8s, it sits at the lowest point of the oil pan. Early 1980s models offer simple access but may use old-style filters or strainers depending on the model.
- Position your drain pan and remove the plug. Loosen it counterclockwise with the correct socket. As it comes free, angle it away so hot oil doesn’t run down your arm.
- Let the oil drain completely. Give it 10-15 minutes. Rushing this step leaves old, dirty oil behind.
- Remove and replace the filter or strainer. Spin-on filters unscrew counterclockwise. For air-cooled engines, classic VW Beetle oil change steps show that air-cooled engines require removing the strainer with low torque on nuts, typically around 5 ft-lbs, and cleaning the strainer screen before reinstalling.
- Install the new filter or cleaned strainer. Hand-tighten a spin-on filter, then snug it an additional 3/4 turn. Do not use a wrench to tighten.
- Replace the drain plug with a new gasket. Torque it to spec. For most 1980s V8s, that’s in the 15-20 ft-lb range.
- Refill with the correct oil. Use a funnel. Add oil slowly and check the dipstick frequently.
If you’re working on a changing oil in Cadillac Cimarron or want to confirm the oil type for Buick Regal 4.1L, always cross-reference your owner’s manual with a trusted resource before finalizing your oil selection.
| Step | Key action | Common mistake |
|---|---|---|
| Drain plug removal | Use correct socket size | Rounding the plug head |
| Filter removal | Spin counterclockwise | Forgetting to position drain pan |
| Strainer cleaning | Gentle rinse, inspect screen | Reassembling with debris inside |
| Drain plug reinstall | Torque to spec with new gasket | Over-tightening and stripping threads |
| Oil fill | Check dipstick in stages | Overfilling the crankcase |
“The difference between a good oil change and a costly repair often comes down to torque. Use a torque wrench every time, especially on vintage drain plugs where threads are already decades old.”
Pro Tip: Before installing a spin-on filter, fill it partially with fresh oil and lightly coat the rubber gasket with clean oil. This prevents a dry start and helps the gasket seat properly.
Common pitfalls and troubleshooting for 1980s engines
Even with a perfect oil change, classic car owners should know what to watch for and how to quickly troubleshoot typical DIY issues.
The most common mistake on vintage engines is over-tightening the drain plug. Older oil pans are often made of softer metals, and stripped threads mean an expensive repair. Always use a torque wrench rather than guessing by feel. Procedures for 1980s cars are similar to modern vehicles, but watch for vintage quirks like strainers versus spin-on filters that can catch even experienced mechanics off guard.
Watch for these issues after every oil change:
- Oil dripping from the drain plug area (loose plug or failed gasket)
- Seepage around the filter base (cross-threaded or not fully seated)
- Strainer cover leaks on air-cooled engines (incorrect orientation or missing gasket)
- Oil pressure warning light staying on after startup (low fill level or air in the system)
- Burning oil smell from the exhaust (overfilled crankcase)
Filter and strainer confusion is real. Many owners of 1980s vehicles assume their car uses a standard spin-on filter, only to discover a strainer system under the engine. Check your service manual before ordering parts. Ordering the wrong filter wastes time and can leave you stranded mid-job.
For oil selection for Buick Regal 3.8L engines and similar vintage V8s, the video demonstration for Cadillac V8 is a practical visual reference for understanding filter placement and access points specific to that generation of engines.
“Never assume a vintage gasket will seal a second time. A 40-year-old crush washer that looks fine can fail within miles of your first startup. Replace it every single time.”
Pro Tip: Prime your new oil filter by filling it with fresh oil before installation. On engines that sit for long periods between oil changes, this prevents a dry start that can cause momentary metal-on-metal contact.

Checking your results: Tips for safe startups and ongoing maintenance
After the oil change, performing a careful check and routine maintenance helps preserve your engine’s health.
Post-change startup procedure:
- Before starting, visually inspect under the car for any drips around the drain plug and filter.
- Start the engine and let it idle for 60-90 seconds. Watch the oil pressure gauge or warning light.
- Shut off the engine immediately if the oil pressure light stays on.
- Let the engine rest for 5 minutes, then check the dipstick. The oil level should sit between the two marks.
- Run your hand or a clean rag around the filter and drain plug area to feel for moisture.
As confirmed in a 6.0L V8 example, checking your oil level and watching for leaks after startup is essential for early 1980s engines, where seals and gaskets may already be aged.
Ongoing maintenance habits that protect vintage engines:
- Keep a written oil-change log with the date, mileage, oil brand, and grade used
- Check oil color and level every two weeks if the car sits for extended periods
- Look for milky or foamy oil on the dipstick, which signals coolant contamination
- Watch for a persistent burning smell, which can indicate oil on a hot exhaust component
- Reference ongoing oil recommendations for Buick LeSabre and similar models to stay current on best practices
One day after the first startup, re-check the drain plug and filter torque. Oil expands and contracts with heat cycles, and a plug that felt tight can work slightly loose after the engine reaches full operating temperature. This one extra step prevents the slow drip that stains your garage floor and costs you oil between changes.
Why classic car oil changes are misunderstood—and what matters most
Here’s the honest truth: most owners avoid DIY oil changes on their 1980s classics because they assume something will go wrong. The car is old, the parts are fragile, and modern tutorials don’t quite fit. That fear is understandable, but it’s also largely unfounded.
The biggest myth is that all oil filters are interchangeable. They are not. Grabbing a generic spin-on filter from the shelf without confirming compatibility can result in a poor seal, a slow leak, and contaminated oil within weeks. The fix is simple: look up your exact model and engine before you buy anything.
What actually matters is paying attention to your specific car’s quirks. The oil needs for Chevrolet Cavalier differ from a same-year Buick V8, even though both are early 1980s vehicles. Learning those differences is not complicated. It just requires looking them up once.
The satisfaction of doing this job yourself goes beyond saving money. Every time you change the oil on your classic, you understand it better. You notice things. You catch a small leak before it becomes a big one. These skills compound over time and genuinely reduce your repair bills.
Where to find the best oil for your 1980s classic
Ready to ensure your classic runs strong? Get the best oil for your model with a few clicks.
Finding the right oil for a specific 1980s vehicle used to mean calling around to parts stores and hoping someone knew the answer. Now you can look up exact recommendations by model and engine. Whether you need fluids for 1982 Chevrolet Suburban or fluids for 1982 Ford F250, greatmotoroil.com has vehicle-specific guidance organized by make, model, and engine size. Browse more classic car oil options to find the right lubricant for your exact engine, so your next oil change starts with complete confidence.
Frequently asked questions
How much oil does a 1980s classic car typically require?
Most early 1980s classic cars require between 4 and 5 quarts of oil. A VW Beetle air-cooled engine uses roughly 3 quarts, while most V8s fall in the 4-5 quart range. Always verify with your owner’s manual.
Do all 1980s classic cars use the same oil filter?
No. Some use spin-on filters while others, like air-cooled VWs, use a strainer system. Check for vintage-specific details like strainers versus spin-on filters before purchasing any parts.
Is it okay to use modern synthetic oils in vintage engines?
Many owners use high-quality synthetic oils in their 1980s classics with good results, but always verify compatibility with your existing seals and gaskets, and consult a vintage car specialist if you are unsure.
What’s the correct torque for my oil drain plug?
Air-cooled VW engines require low torque, around 5 ft-lbs for strainer nuts. Most 1980s V8 drain plugs fall in the 15-20 ft-lb range. Always confirm with your vehicle’s service specifications.
Recommended
- Recommended oil for 1982 Buick Lesabre 5.0L – The best synthetic oil for vehicle maintenance
- Recommended oil for 1982 Dodge OMNI 2.2L – The best synthetic oil for vehicle maintenance
- Motor oil for 1982 Isuzu I-mark 1.8L – The best synthetic oil for vehicle maintenance
- Best oil for 1982 Chrysler Lebaron 2.6L – The best synthetic oil for vehicle maintenance